blog 6 (project development)
Hi everyone, welcome back to my final blog for this module! In this blog, I will be sharing on our chemical device and our prototyping process.
1. Our team Chemical Device
Background on our issue:
According to the Singapore Police Force, drunk driving was the major cause of road traffic accidents in Singapore. The amount of individuals arrested for driving under the influence has remained above 1500 since 2019. Channel News Asia also indicated in late 2022, that deaths from drunk driving accidents have doubled in 2022 as compared to in 2021. From these statistics, we can conclude that driving under the influence of alcohol is a prevalent issue in Singapore, that is both life threatening for drivers and road users.
According to Singapore's law, an individual is considered to be intoxicated/driving under the influence of alcohol if they exceed 35 mg of alcohol per 100ml of breath or 80 mg of alcohol per 100ml of blood. It was proven that those who drive above the legal limit of 0.08% BAC were 11 times more likely to get into a car accident as compared to a sober person. Taking these shocking statistics into account, my group mates and I wanted to create a solution that protects both the drivers and pedestrians, hence creating a safe environment for the general public.
To create a more personalised chemical device, we first identified our user and came up with the problem statement for our project. This way, we will not lose track of our objective for our chemical device!
Hence came about our project statement, 'How do we help prevent drivers in Singapore from driving under the influence of alcohol?’. Our product primarily hopes to cater to casual drinkers who drive frequently.
Our chemical device:
Our device is a breath analyser that is in-built in a car, and functions on car battery. Before the driver is able to drive, he must blow into the breath analyser. As a safety mechanism, the keyhole of the car would be closed with an automatic lid. If the driver’s blood alcohol count (BAC) is less than 35 mg of alcohol per 100ml of breath, the lid will be open and the driver would be able to insert the key into the keyhole to start the vehicle’s engine. The BAC will also be displayed on the LCD of our device. In the event the driver’s BAC is above the legal limit, the keyhole lid will be closed and the driver will be notified. The driver can choose to sober up if he wishes to drive, or take another form of transport that will not pose a danger to the public.
A special feature that makes our breath analyser, would be the in-built temperature sensor present in our breathanalyser. Most commercial breathanalysers are often calibrated at 34 degrees centigrade. However, after multiple continual uses of the device, the temperature of the device rises causing inaccuracies in the readings since the breath of people tends to come closer to 35.5 degrees centigrade instead when driving under the influence of alcohol. Hence this leads to a 10% to 20% increase in the obtained concentration reading as compared to the actual value. Hence, we have implemented a cooling mechanism into our final product.
This is the hand sketch of our chemical device:


2. Team Planning, allocation, and execution
These are my team members and their roles:
Chief Executive Officer (CEO) - Sreenithi (me)
Chief Operation Officer (COO) - Jun Yi
Chief Financial Officer (CFO) - Abhishek
Chief Safety Officer (CSO) - Matthias & Eng Kiat
Our Finalised Bill of Materials (BOM)

Finalised Gantt Chart
This is the finalised GANTT chart for our prototyping journey. The yellow boxes represent the planned execution date while the grey boxes represent the actual executed days.

Task allocation:
CADD (fusion) & Laser cutting - Sreenithi & Eng Kiat
Arduino programming - Jun Yi & Abhishek
3D printing - Matthias
Product assembly - ALL
Hi everyone, welcome back to my final blog for this module! In this blog, I will be sharing on our chemical device and our prototyping process.
Part 1. Design and Build of Reusable Mouthpiece and Laser Cutting (Done by Sreenithi)
Documentation for task 1
Part 2. Design of breath analyser body and Laser Cutting (Done by Eng Kiat)
Documentation for task 2
Part 3. Arduino Programming (Done by Abhishek and Jun Yi)
Documentation for task 3
Part 4. Assembly of prototype (Done by everyone)
Documentation for task 4
Links to my group members’ blogs:
Abhishek: https://cp5070-2022-2b02-group1-abhishek.blogspot.com/2023/02/bokena-series-pt-2-blog-6.html
Jun Yi: https://jylai21.wixsite.com/cp5070-2022-2b02-gro/post/blog-6
Eng Kiat: https://cp5070-2022-2b02-group1-engkiat.blogspot.com/2023/02/project-development.html
Matthias: https://matthiasnglokyi.wixsite.com/cp5070-2022-2b02-mat/post/blog-6-project-development
3. Design and Build Process
Our initial Idea:
When we first brainstormed on our solution (prototype), we wanted to satisfy some key needs. We wanted our device to be of high accuracy and we wanted it to be a sustainable version. To introduce sustainability to our product, we decided to use reusable mouthpieces where the mouthpiece can be removed and cleaned before being reattached again. We chose this option as we wanted to minimise waste and also make our product cost friendly to our user.
We wanted to use both a temperature sensor and alcohol module sensor in our chemical device. When air is blown into the mouthpiece, the alcohol module sensor detects the BAC while the temperature sensor detects the temperature of breath. Since the breaths are usually slightly higher than the ideal required value, we wanted to insert vents at the bottom of our breathanalyser so that temperature becomes slightly lower since hotter air escapes through these vent holes. When the temperature reaches ideal value, the margin of error for the BAC reading is much smaller, hence producing a more accurate breathanalayser.
Firstly, we allocated the tasks for each person as we wanted to divide our workload equally and work more efficiently. Eng Kiat and I were in charge of constructing designs on fusion 360 for the body of the breathanalyser and the mouthpiece. Meanwhile Jun Yi and Abhishek were in charge of the arduino programming for the LCD display of the alcohol level and temperature level. Matthias was in charge of constructing a mechanism for our chemical device.
This was our first sketch on the dimension requirements we wanted for our chemical device:

This sketch was carefully constructed taking into account the space needed for 2 arduino boards, a temperature sensor, an alcohol module sensor, a breadboard and wire lengths.
When we moved on to construct our design onto fusion 360, we later realised that the dimensions could be reduced further for the mouthpiece as we wanted to make this user- friendly. A smaller mouthpiece would be more comfortable for the user to blow into and easier to be cleaned too. Hence we modified our dimensions again and came up with our final dimensions for our chemical product.
Finalised dimensions:


FINALISED IDEA (SKETCH):
We made some amendments from our initial sketch as we had not implemented our mechanism during our initial sketch. We used a pulley system for our mechanism. Hence when the alcohol level in breath is too high, the keyhole will be closed and the driver will not be able to insert his key into the keyhole and start the vehicle’s engine. Even if the driver attempts to forcefully insert the key into the keyhole without taking the breathanalyser test, the car will have a secondary safety mechanism that will sound an alarm and turn off the engine automatically. After implementing our mechanism, our final sketch of our idea is shown below.
Final Sketch:
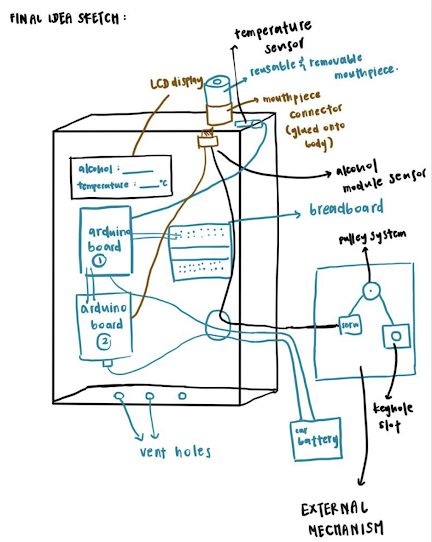
Image of our mechanism:

CADD (fusion 360) process:
I used Autodesk fusion 360 to create my 3D design before exporting it to Cura and sending it for 3D printing. The step by step process is documented below.
FUSION OF MOUTHPIECE (reusable)
Firstly, select “create” and select the diameter of the circle to be 28mm (2.8cm).

Next, extrude to form a cylinder of height 25mm (2.5cm)

After extruding, click “create” and select “thread” to create the threading for the reusable mouthpiece.

Select the middle face to apply the threading to. Ensure that the box “full length” is not ticked, as we only want to apply threading up 7mm (0.7cm) length.

5. After applying threading, click “hole” to create a hole so that air can enter through the mouthpiece.

Specify the hole diameter to be 23mm (2.3cm) and the depth of the hole to be 25mm (2.5cm) in height.

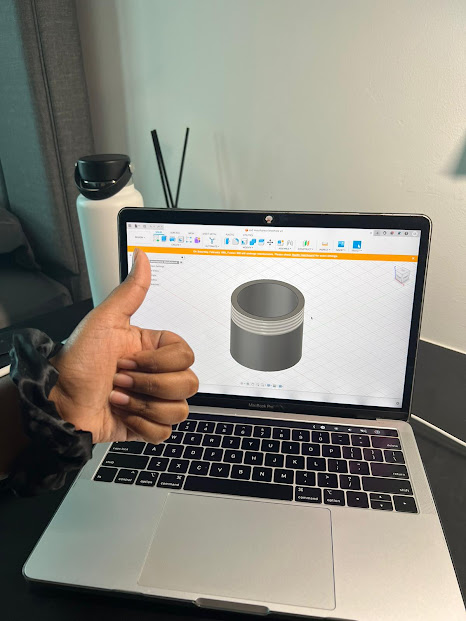
The end product should look like the image below. .

Hero shot with fusion design :-)
After saving the fusion 360 file onto your device, export it and open the file on Cura.

Specify the infill and 3d printer type. Then proceed to slice before sending it for 3d printing

FUSION OF MOUTHPIECE CONNECTOR:
Firstly, select “create” and select the diameter of the circle to be 30mm (3cm).

Next, extrude to form a cylinder of height 15mm (1.5cm).

Then, click “hole” to create a hole so that air can enter through the mouthpiece. Specify the hole diameter to be 26mm (2.6cm) and the depth of the hole to be 15mm (1.5cm) in height.

Lastly, create threading on the inner surface of the polygon and specify threading height to be 7mm (0.7cm). Ensure that the “full length” box is not ticked. The final product should resemble the image below.

After saving the fusion 360 file onto your device, export it and open the file on Cura.

Specify the infill and 3d printer type. Then proceed to slice before sending it for 3d printing

After CADD designing, we simultaneously went to laser cut for the body of our breathanalyser! You can check out the CADD for the body of our breathanalyser in Eng Kiat’s blog!
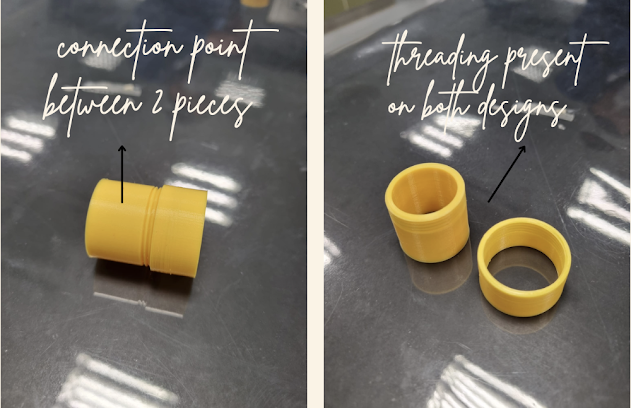
After sorting out the fusion for our mouthpiece and mouthpiece connector, we sent it for 3d printing. The final product is shown below.

Laser cutting process:
While 3D printing out design, we simultaneously laser cut materials for the body of our breathanalsyer. For laser cutting, we designed the CADD using the reference dimensions shown above.
Here are some images and videos from our laser cutting sessions:
Eng Kiat assembling the laser cut components together to ensure proper fit
Video from laser cutting process
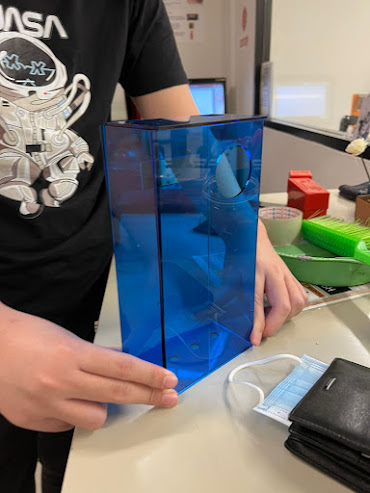
Our laser cut acrylic after laser cutting and glueing together

After finishing the laser cutting process and 3D printing process, we finally proceeded to integrate the components together to form our chemical device.
System integration process:
Here are some images from our integration process:
Hero shot of me glueing the mouthpiece to the breathanalyser

Result after glueing mouthpiece

My group members constructing the external mechanism (keyhole cover)
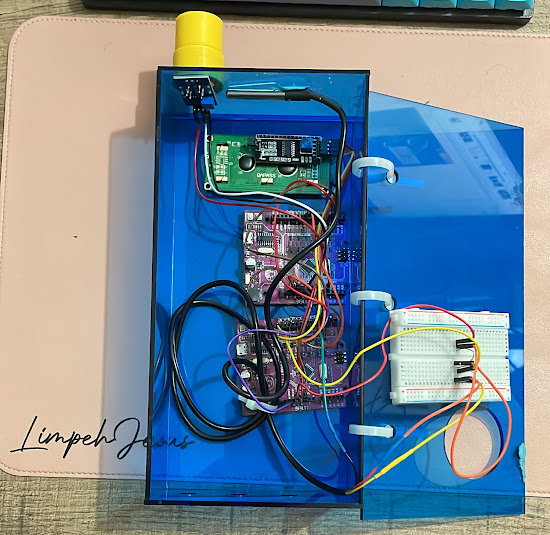
Results after placing arduino boards and components into our device


Hero shots of our finished product! :-)


Here is the embedded fusion designs!
Here is a bonus video of Abhishek explaining how our external mechanism compliments our chemical device! enjoy haha
4. Problems and solutions
In this section I will describe the problems encountered in the design and build process and how the team solved them.
Problem 1: It was difficult to assemble as there were too many wired components.
Solution: We modified the dimensions of the breathanalyser so that it accommodates for the presence of 2 arduino boards, a breadboard, an alcohol module sensor, a temperature sensor and multiple wires.
Problem 2: Dimensions of the breathanalyser increased, hence making it harder for our device to be compact
Solution: We decided to modify our modifications to be of the perfect fit and no excess acrylic will be leftover.
Problem 3: When constructing pulley, it was difficult to find the optimal length between servo and key hole cover
Solution: Trial and error had to be carried out before finding the optimal length. To make it easier for us to solve this solution, we used multiple pieces of thread of different lengths and tied them together so that the pulley can function better. This way, the thread can be more flexible to be adjusted according to different length requirements for the pulley.
Problem 4: Our original laser cut designs did not fit together properly as we did not accommodate for the thickness of the acrylic pieces
Solution: We modified the fusion design again to accommodate the thickness of the acrylic (3mm). Initially, our height for the product was 24cm. However our new dimensions were now 24.8cm so that 3mm can be accommodated for each side, with sufficient amount of excess acrylic left if we wanted to sand off the sides of the acrylic. With these new dimensions, the product could stick together perfectly with minimal gaps in between.
Problem 5: If the acrylic was to be fully glued together with acrylic glue, the internal components cannot be adjusted if the code doesn’t work and need amendments
Solution: Since we did not want to fully glue all 6 sides together, we only glued 5 sides with acrylic glue. We left the back part of the breathanalyser unglued. However to secure the back piece to the rest of the body, we ensured that the back piece was drilled with 3 holes with a diameter of 0.8cm. We decided to use cable ties to secure the back piece, to replicate a hinge mechanism. To provide extra support, we also used bluetack to secure the other end of the back piece. This way, if we wanted to make adjustments to the internal components, the insides can be easily assessed. We chose to use bluetack as although it is removable, it still provides sufficient support for the breathanalyser to stay together
Problem 6: Alcohol level did not show any change in the presence of alcohol
Solution: For coding, had to change int alcohol Level = AnalogRead() to int alcoholLevel = mySerial.parseInt() in the 2nd board as the alcohol level signal is from the 1st board and not the 2nd. Hence this code interprets the data from the 1st board.
5. Project Design Files as downloadable files
In this section, I will provide all the design files (Fusion360 files, .dxf files, .stl files, arduino programs files) as downloadable files.
Link to google drive: https://drive.google.com/drive/folders/1CrlALAeOfzeJmCTNVM-NaieptvTDgiua
6. Below is my Learning Reflection on the overall Project Development.
The project development process was effective in terms of testing my knowledge from both the ICPD and CPDD modules. Skills such as fusion 360, laser cutting and arduino programming were revisited during this chemical product design journey. This journey was filled with many ups and downs as there were many hiccups we faced along the way.
For example during 3D designing, our first print came out too big for our prototype and hence it could not be used. Hence we had to undergo modification in our fusion process all over again just so we can print a more fitting mouthpiece. Ultimately this was time consuming and put our other tasks on hold while we waited to sort out this issue. This meant we had to compensate more on other days to keep up with any time lost so that we could stay on schedule. Hence, this project development journey helped me realise the importance of time management and also taking initiative in my learning. It was really helpful when we allocated different roles to each other because this way, we could get more done within a shorter period of time. Moreover, this meant that everyone would be on track with the project and no one would feel left out. This project taught me the importance of teamwork and encouraged me to be more receptive to feedback from my group members. Throughout this project, all of us had many differing opinions on different issues. Although this occasionally led to heated arguments, it also helped each one of us to broaden our thinking and be more receptive to new ideas. From there, we found a common ground to execute our ideas!
Although our end product can still be improved further, I am glad I had the opportunity to apply my skills on arduino programming, fusion 360, laser cutting to create a chemical product from scratch. This was a tiring and challenging journey but I am glad that I had my lecturer Mr Chua by our side to guide us through this journey. I look forward to applying my skills learnt from this module for my future endeavours and my final year project! :-)
Comments
Post a Comment